Instrumentive User Guide
Practice Sessions In Depth
Practice sessions are the heart of Instrumentive. Each session is a log of what you worked on, how long you spent, and any notes you made along the way.
The session workflow
A typical session flows like this:
- Start a session — tap START on the home screen, or create a new session from the Practice Sessions tab.
- Add activities — add the pieces and exercises you plan to work on (or add them as you go).
- Practice — use the timer, metronome, and recording features while you work.
- Make notes — jot down observations as you practice each activity.
- Finish — stop the timer and any recording, then review your activities, practice times, and notes. Your changes are saved automatically. Return to the Practice Sessions tab, where you can open the session again to review it later.
Activities
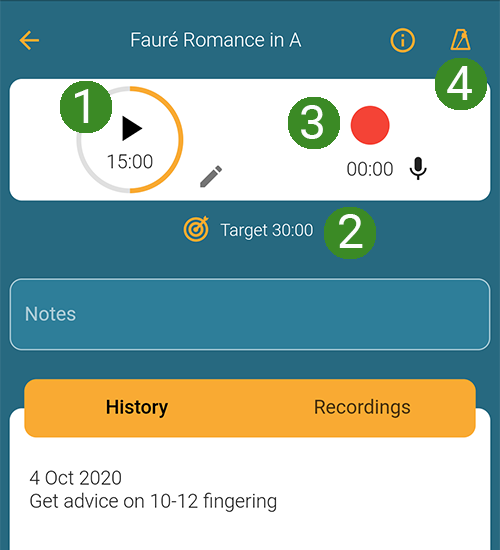
Each item you practice within a session is called an “activity”. For each activity you can:
- Start and stop the timer (1.) to track exactly how long you spend on it.
- Manually enter a time if you prefer not to use the timer — tap the pencil icon next to the timer.
- Set a time target (2.) so you know when you’ve put in enough work on that item.
- Write notes specific to that activity in that session — what went well, what needs more work, what to focus on next time.
Reviewing notes from previous sessions
- Add or select a piece you have practiced before in your current session.
- On the activity screen, tap History below the Notes field.
- Read the dated notes from previous sessions to see what you worked on and what you planned to practice next.
- Write your observations for today’s practice in the Notes field above the history.
Use the same library item each time you practice a piece so you can review its previous sessions together.
The metronome
Instrumentive has a fully-featured metronome built right into the session screen. To open the metronome tap the icon at the top of the activity screen (4. in the screenshot above).
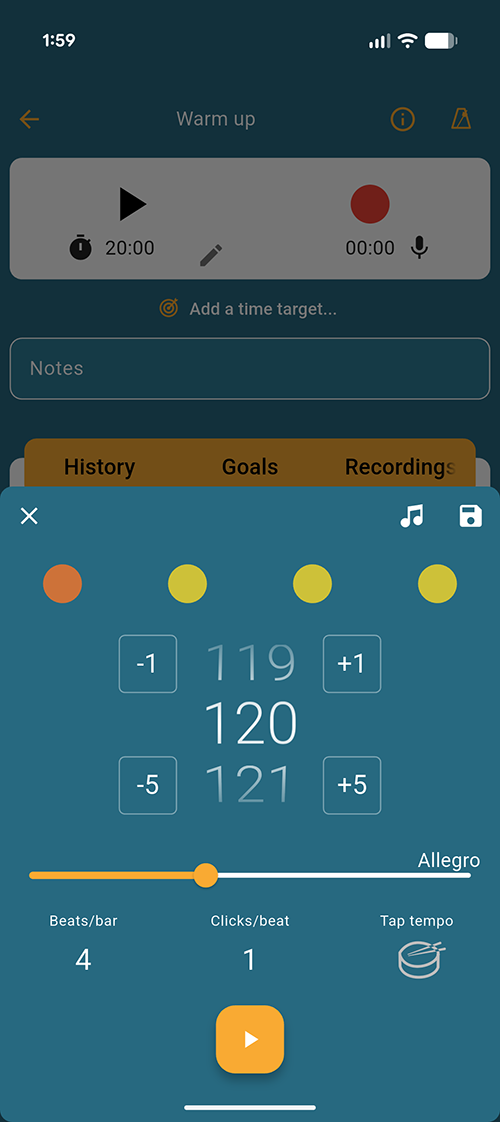
- BPM control — set any tempo you need, or use tap tempo to match a tempo by tapping.
- Subdivisions — add subdivisions to help with tricky rhythms.
- Sound presets — choose from different click sounds to suit your taste.
- Drone — play a sustained pitch alongside the click to help with intonation.
The metronome keeps running while you practice, even if you navigate to other parts of the app.
Recording your practice
You can record audio directly from within a session. Tap the record button to capture your playing. Recordings are automatically linked to the session and activity, so you can find them later.
Getting the most from sessions
At the end of each session, take a moment to review your notes. Write down what to focus on next time — even a single sentence is enough. This small habit turns Instrumentive from a simple timer into a genuine practice journal, and your future self will thank you for it.
Organising Your Library
The Library is your central catalogue of everything you play — pieces, exercises, scales, études, warm-ups, sight-reading material, or anything else you want to track. Think of it as a living index of your musical life.
Adding pieces and exercises
Tap the + button in the Library tab to add a new item. Give it a name (e.g. “Bach Cello Suite No. 1 — Prelude”) and optionally add a composer or author. You can also add notes — for example, a reminder of which edition you are using or what key it is in.
Items you practice during sessions are automatically added to your library, so you don’t need to set everything up in advance. But spending a few minutes adding your current repertoire up front makes it easier to find things later.
Favourites
Tap the heart icon on any library item to mark it as a favourite. Favourites float to the top of your lists, making it quick to find the pieces you are working on right now.
Notes on a piece
Each library item has its own notes field. Use this to jot down anything you want to remember — a tricky fingering, a teacher’s instruction, a target tempo.
Using tags to organise your library
Tags are the primary way to organise items in Instrumentive. They work like labels that you can attach to any piece, exercise, session, or recording.

Look out for the “Add a tag…” buttons throughout the app.
Why tags instead of folders? A single piece can belong to multiple categories at once. For example, a Bach Invention might be tagged with Piano, Baroque, Polyphony, and Exam Repertoire — all at the same time. With folders you would have to pick just one place to put it, or duplicate it across several folders.
Tag categories
You can organise your tags into categories to keep things tidy. Common categories include:
- Instrument — Piano, Violin, Voice, etc.
- Artist / Composer — Bach, Chopin, Ellington, etc.
- Genre — Classical, Jazz, Pop, Folk, etc.
- Practice type — Warm-up, Technique, Repertoire, Sight-reading, etc.
- Custom — anything that makes sense for your practice, such as Exam Pieces, Concert Programme, or Needs Work
You can create as many categories and tags as you like.
Applying tags
You can add tags to:
- Pieces and exercises in your Library
- Practice sessions (to mark the focus of that session)
- Goals (to connect goals to specific areas)
- Recordings (to find them later by instrument, piece, etc.)
Filtering by tags
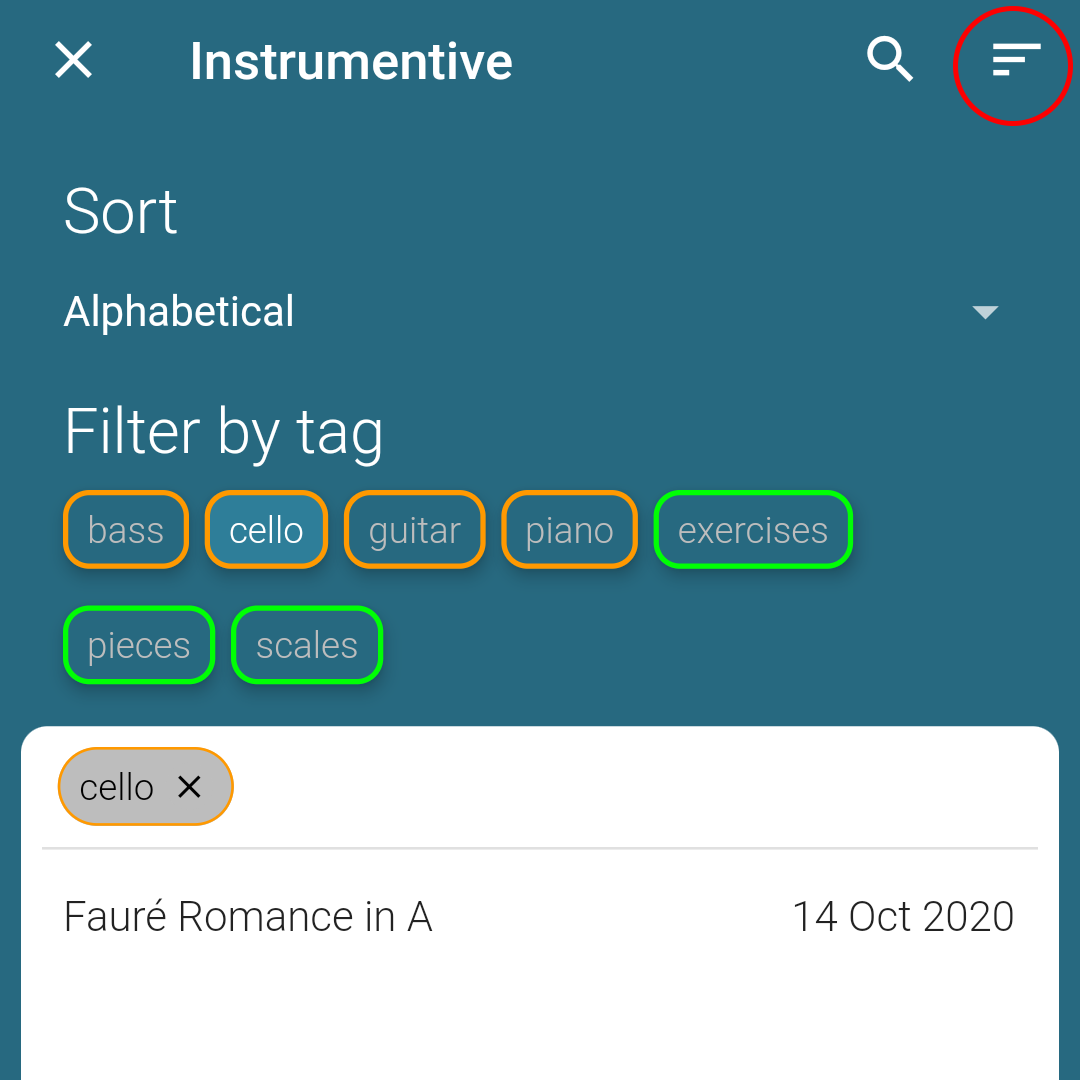
Once you have tagged your items, you can filter any list by one or more tags. This is especially powerful if you play multiple instruments — filter by Violin to see only violin pieces, or by Exam Repertoire to focus on what matters right now.
When filtering by multiple tags you can choose between:
- AND mode — show items that match all selected tags (e.g. Piano AND Baroque)
- OR mode — show items that match any selected tag (e.g. Piano OR Violin)
Batch-editing tags
Need to tag a lot of items at once? Long-press on an item to enter selection mode, then select multiple items and apply tags to all of them in one go.
Tracking Your Progress
Instrumentive gives you several ways to see how your practice is going — from a quick daily glance to detailed statistics over any time period.
Home screen dashboard
The home screen is your at-a-glance summary. It shows:
- Practice summary table — total time, number of sessions, and average session length for the current period.
- Bar charts — a visual breakdown of your practice over recent days or weeks.
- Heat map — a calendar-style grid showing which days you practiced. Darker squares mean more practice.
- Streak counter — how many consecutive weeks you have hit your weekly practice target.
Most-practiced pieces
See which pieces and exercises you have spent the most time on. This can highlight imbalances — if one piece is dominating your practice time, you might want to redistribute.
Per-piece statistics
Open any item in your Library to see its statistics: total time practiced, number of sessions, date last practiced, and a timeline of your work on that piece. This is useful for seeing whether you are giving enough attention to each item in your repertoire.
Filtering stats by tags
All of your statistics can be filtered by tag. If you play multiple instruments, filter by instrument to see stats for just that instrument. Filter by Technique to see how much time you’re spending on technical work versus repertoire. Tags make your data as flexible as you need it to be.
Exporting your data
Need to share your practice log with a teacher, or analyse it in a spreadsheet? Instrumentive lets you export your data in two formats:
- PDF summary — a formatted report suitable for printing or emailing.
- CSV export — raw data you can open in Excel, Google Sheets, or any spreadsheet app for your own analysis.
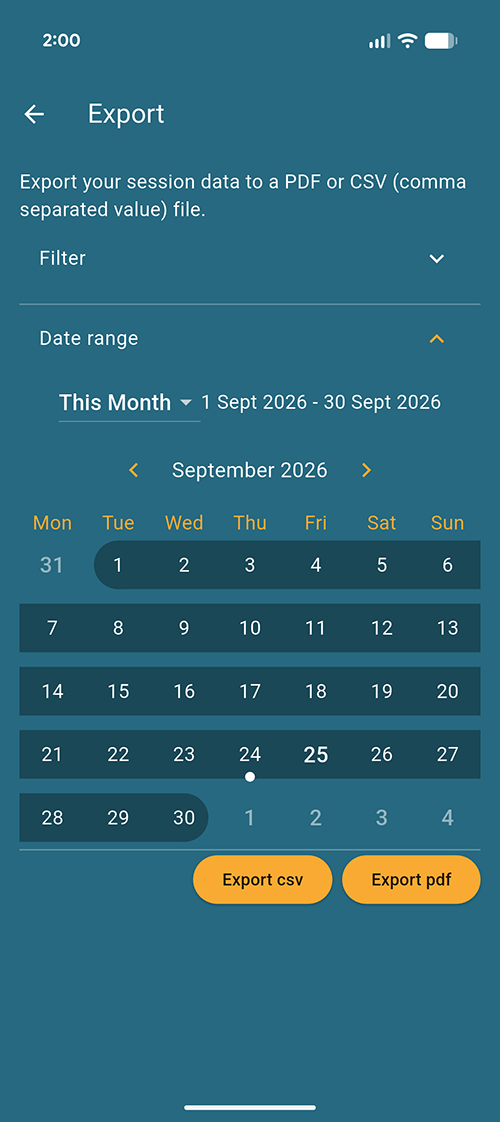
- Open the app’s side menu and tap Export.
- Expand Filter if you want to limit the practice data included in the export.
- Expand Date range and choose the period you want to export, such as This Month. Check the displayed start and end dates.
- Tap Export pdf for a readable report, or Export csv for data you can analyse in a spreadsheet.
Reviewing your progress
Make a habit of reviewing your stats at least once a week. The heat map and streak counter are designed to keep you accountable — a gap in the heat map is a gentle nudge, and maintaining a streak becomes its own motivation. But don’t obsess over the numbers. The real value is in the notes, the recordings, and the gradual improvement you’ll hear when you listen back to old recordings.
Recordings
Instrumentive lets you record your playing directly within the app so you can listen back and track your improvement over time.
Creating recordings
You can start a recording from within any practice session by tapping the record button. The recording is automatically linked to the session and activity you are working on.
Viewing and managing recordings
The Recordings tab shows all your recordings in one place. You can play them back, rename them, tag them, and delete ones you no longer need.
Cloud storage
Your recordings are stored in the cloud and synced across your devices. Keep an eye on your storage quota in the account settings if you record frequently.
Why record yourself
Recording yourself regularly and listening back is one of the fastest ways to improve. Your ear misses things in the moment that become obvious on playback — intonation issues, uneven rhythms, tonal imbalances. Try recording the same passage a few weeks apart and comparing — you’ll often be surprised by how much you’ve improved.